How Roof Installation In San Antonio Tx can Save You Time, Stress, and Money.
Table of ContentsHow Roof Installation In San Antonio Tx can Save You Time, Stress, and Money.6 Easy Facts About Roof Installation In San Antonio Tx ShownHow Roof Installation In San Antonio Tx can Save You Time, Stress, and Money.Little Known Questions About Roof Installation In San Antonio Tx.Roof Installation In San Antonio Tx Things To Know Before You Buy
Once more, I lined up the leading side of the roof shingles with the chalk line and purged the rake side with the starter strip and after that I added 4 nails, adding one at each end, regarding an inch from the ends of the shingle, and then 2 more nails uniformly spaced in the middle of the shingle.Next, I included the first shingle in the 2nd training course, aligning the bottom edge of this shingle with the top side of the flaps on the previous tile, and included more nails. I duplicated the very same procedure for the remaining 3 roof shingles and, once those were nailed on, my very first five programs of tiles were started.
I've got to offer a shoutout to this battery powered roof covering nailer from DEWALT, this thing worked like a champ and also we really did not have to run any air hoses up onto the roofing system. I just experienced regarding 3 5AH batteries on this whole roof covering and had possibly one jam throughout the whole job.
Some Known Facts About Roof Installation In San Antonio Tx.

The initial air vent to layout was for the microwave variety hood, which needs to air vent either vertically or directly out of the rear of the unit, which wouldn't work in this setup. I noted the facility of the microwave on the floor and used my line laser to transfer the mark onto the base of the roof deck, moving the laser 90 degrees in between marks to obtain an accurate mark in both axes.
I'll be using adaptable ducting to connect the washroom follower to the air vent, so the location was a little bit a lot more adaptable, and also I chose to line up both vents up and down because it would look much better visually. After outlining both opening areas, I drilled pilot openings from within and afterwards relocated up onto the roofing system to drill bigger holes using a 4" opening saw.
The Roof Installation In San Antonio Tx Diaries
I also utilized one more shingle as a straight side when reducing, and also this truly aided maintain the cuts great and also straight. After reducing off the excess, I utilized a scrap item of tile top article to burnish the edges of the cut tiles, which cleanses them up and aids them look more like a manufacturing facility edge.
I eliminated the ZIP tape, which was surprisingly hard to get rid of from this PVC, and also after that I used a heavy bead of Fluid Flash, which I spread onto the roof covering sheathing and also vent pipeline (Roof Installation in San Antonio TX). With that said done, I might get the next tile mounted, which required to be notched around the vent pipeline.
Prior to examination suitable the roof boot, I proceeded and also chamfered the edge of the pipeline, and this keeps that sharp edge from damaging the rubber on the roof boot. The boot fit well, so I removed it to include some roof cement, which I applied freely around the border of the bottom of the boot as well as after that I re-installed the boot over the pipeline, accomplishing to the roofing.
Roof Installation In San Antonio Tx Fundamentals Explained
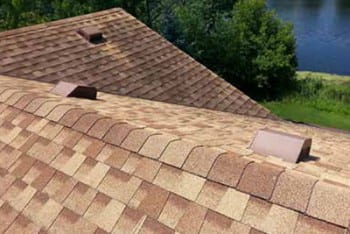
I repeated the same process for the other two roof vents, initially notching the lower training course around the vent hole as well as connecting those tiles, after that reducing a hole in the two shingles in the following training course and attaching those tiles, after that adding roof covering cement to the underside of the vents and affixing them with roofing nails, then lastly scratching the last intersecting course and including more roofing cement listed below that scratched edge before attaching those roof shingles.
We cut short of the extremely top training course on both sides of the roof so, after including the remainder of the training courses on the front face of the roof covering, I laid out just how every little thing would certainly come together with the ridge shingles. Fortunately, with another training course on both sides of the roofing system, the ridge roof shingles would cover basically flawlessly, Discover More so I got to work including the last program to the rear end of the roof covering.
I also sliced through that short-lived ZIP tape we had actually included during the roof sheathing procedure and eliminated it, as this location needs to be open for air flow. I duplicated find out this here the same process beyond of the roofing system off electronic camera, adding the last course and also trimming away the unwanted from the ridge, and also with that said, we were prepared to mount the ridge vent (Roof Installation in San Antonio TX).
Our Roof Installation In San Antonio Tx PDFs